4 - Feather Preparation
4 - Feather Preparation
- HOW TO MAKE A NATIVE INDIAN HEADDRESS / WARBONNET ? -
Feather Anatomy:
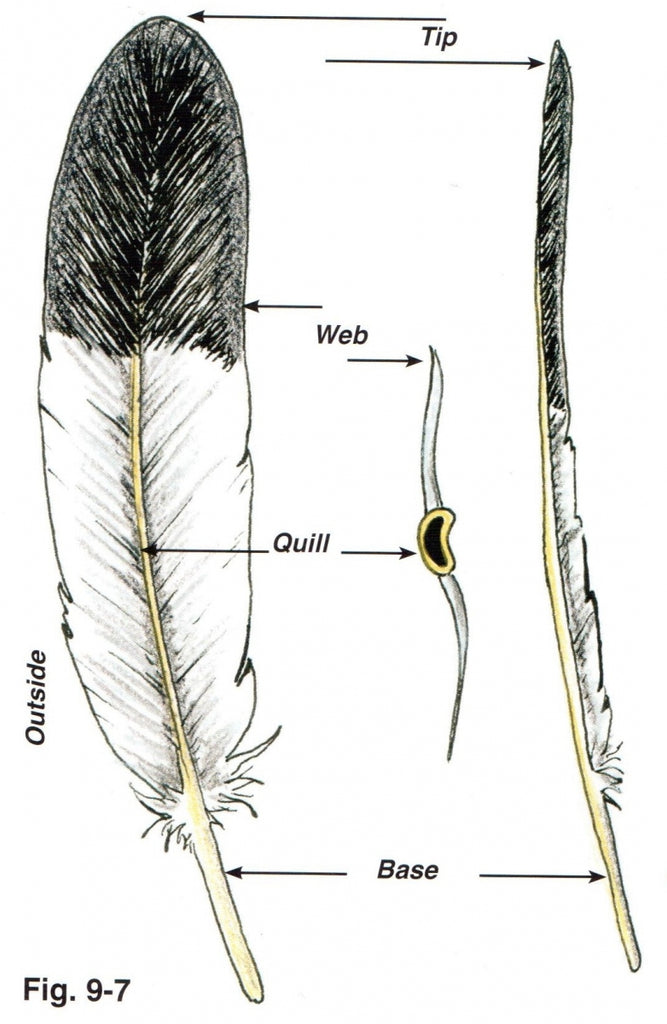
In the following instructions, we will use terms for the various parts of a feather. (Fig. 9-7) The Quill is the main shaft of the feather, while Web or Webbing refers to the thin, soft material on either side of the quill. The end of the feather where the quill is the thinnest is referred to as the Tip or Top, and the thickest end of the quill is referred to as the Base or End of the feather. In determining which side of the feather is the Front or Back, note that the webbing on one side has a slight gloss, while the other side has a “flat”, dull surface finish. We refer to the glossy side as the Front and the dull side as the Back. This is especially evident in natural feathers like those on old warbonnets.


Another feature of the feather has to do with which of the bird’s wings – left or right – the feather comes from. Every turkey wing feather has a slight curve to the quill. When looking at it from the front, if it curves to the left, it comes from the left wing, and vice versa for right curved feathers. You will also notice that, often, there is more webbing on the inside of the curve. Below, the terms Leftsand Rights refer to the feathers that come from the respective left or right wing. In Fig. 9-7, judging from the curve of this feather and looking at it from the Front, This a Right wing feather.
Center Feather:
The tail feathers of raptors, such as eagles, contain an even number of feathers. (See Fig. 7-1 and Fig. 7-3) However, the two feathers in the middle are straight. These are commonly referred to as Center Feathers. These feathers have a straight quill and a near-equal amount of webbing on both sides of the quill. (Fig. 9-8) In other words, they appear symmetrical. Wings, however, do not have a center feather, and this includes turkey wing feathers from which the Imitation Eagle feathers are made. So, if you want your bonnet to have a single Center Feather (and, therefore, an odd number of total feathers), then you should select an appropriate turkey wing feather and trim it so that its webbing is symmetrical. You first will have to straighten the quill before trimming the web. (See below for information on Trimming Feathers.)


Feather Sorting:
Determine which feathers are Lefts and which are Rights, and divide them into the two groups. There should be an equal number for each side (15 in this example), plus a center feather, if desired (Fig. 9-9)


Note on Trailer Feathers: All the feathers in a trailer should be from the same side, with a Double Trailer having one trailer of Lefts and one of Rights. Usually the shortest feathers from an entire batch are used for the trailers, so keep this in mind when you originally purchase and sort your feathers. Each trailer consists of a minimum of 15 feathers spaced 2” apart. However, you may want more feathers in your trailer for greater effect or because you are tall.
Straightening:
The quills of most real eagle feathers have fewer curves or a different curvature than turkey feathers. Therefore, you will need to straighten your turkey feathers to get the best results. There are two basic methods for straightening the quills: heating and crimping. Heating is a tedious process and, if you are not careful, you can over-heat the webbing, causing it no curl. However, heating will not mar the quill like crimping does. We will describe both methods.
Heating:
Option 1: Hold the feather at both ends and run the quill over a bare light bulb (no more than 100 watts) as shown in Fig. 9-10. You may wish to protect your eyes with sunglasses because of the total time it takes to straighten all the feathers. Heating the quill on both front and back will give the best results. As the quill begins to soften, gently apply steady pressure to it as you move it back and forth over the hot bulb. Attempt to bend the quill so that it is straight both from side to side and from front to back. Once it has achieved the desired shape, hold the quill in that position, away from the bulb, until it has cooled. Note: As you heat the quill, be very careful not to touch the webbing to the bulb, or else the webbing may curl.


Option 2: Instead of a bulb, you can use a steam kettle to heat the quill; this also is faster. You should use a kettle with a spout, not an open pan of water. However, the steam will be very hot and can easily curl the webbing if not consistently directed only at the quill. If you wish to use this method, practice first on some waste feathers. As the quill is heated, it must be bent beyond the point where you want it to end up by passing it through the steam until you feel the tension release. When this happens, the quill is softening and can be reshaped. At that time, pull the feather away from the steam and hold it in the desired final position until it cools. Of course, be very careful to not burn yourself on the live steam.
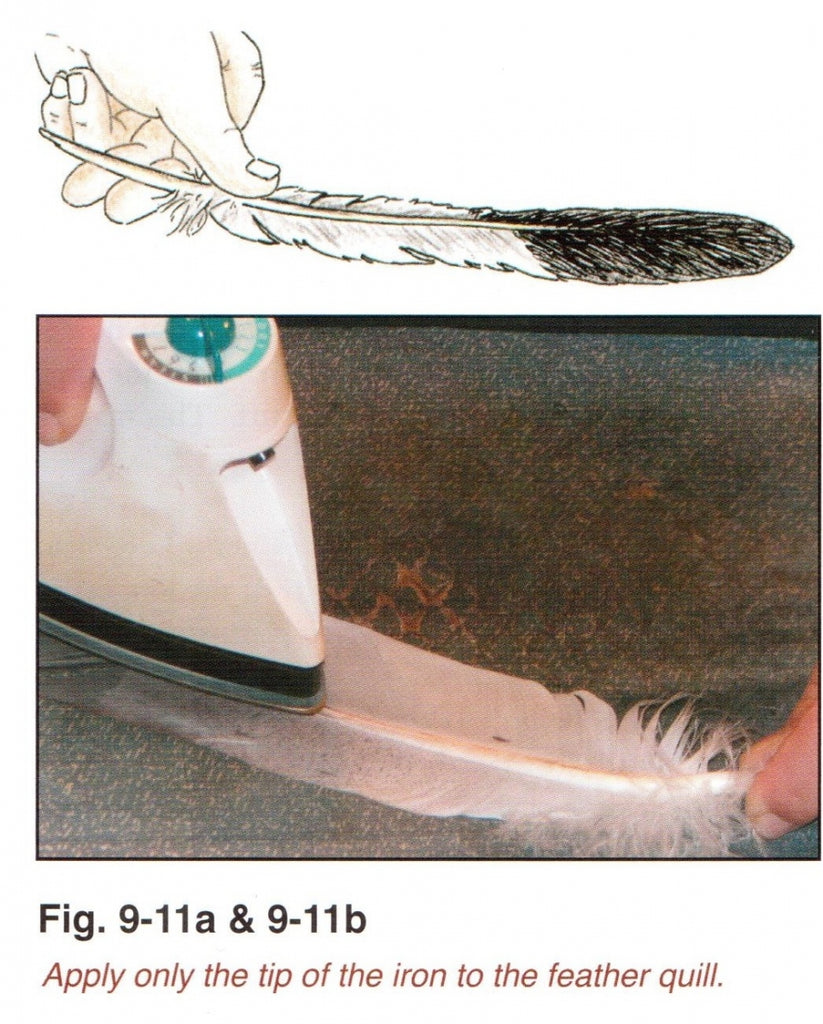
Option 3: Ironing – Turn on the iron with the heat level at the “cotton” or “high” setting. When it is hot, use the iron on a practice feather. It should not mar the quill (causing blisters or burns). If it does, reduce the heat and try again.
When ready, take a feather, and hold it by the base as shown with the “top”/glossy side up. Apply the tip of the iron to the quill and gently press the feather down on your ironing surface until the entire web portion is flat. (Fig. 9-11a & 9-11b). Heat the quill slowly and carefully. Note: Touching the webbing with the iron may damage it.


After the quill is sufficiently heated, take both hands and hold the feather so it is straight both up and down and left to right. This will cause the quill to bend in the opposite directions from its natural curve. When satisfied with how the feather is straightened, hold the feather in that position until the quill cools.
Crimping:
A faster method for straightening is crimping. To crimp the quill, use thumbnail pressure and make small crimps every 1” or so along the shaft. Start at the bottom and, while pulling the feather at the tip in the desired direction with one hand, crimp with the other. Remember, you need to straighten the quill from left or right and from front to back. Be careful near the tip, as too much pressure will actually break the thin quill. Again, practice first on waste feathers. This method, while fast, will also leave visible crimps. However, most of them will be covered by the fluffs and the other crimps will not noticeable from a short distance away.
Regardless of which method you use, after straightening the feathers, they should lay evenly and flat on the work surface. If any feather does not, re-shape it.
Feather Trimming:
This is one of the most important steps in creating an authentic looking bonnet. Turkey feathers do not have the same shapes as eagle feathers, and so they must be trimmed. Most or all of the trimming will be done on the black end.
Probably all of your feathers have ragged looking tips, so the tip must be trimmed to present a neat end. Also, the quill is exceedingly thin near the tip, and it will be too weak to support the weight of horsehair. If you plan to use horsehair, then trim the quill down to where the quill starts to be stiff. This may be as much as 1” from the natural tip.
Lay out the straightened feathers, Lefts and Rights. Then arrange the feathers from the longest to the shortest for each side. Take the shortest feather from one side, and then clip off the tip with a very sharp pair of scissors (Fig. 9-12) If you will not use horse-hair, cut the tip just below the ragged part of the tip webbing. If horsehair is to be used, cut the tip further down. Note how many inches of black remain on this feather. If you want the finished bonnet to have matched feathers, then trim all the other feathers so that they have the same amount of black (ideally, 3”).
Otherwise, clip the tip of each feather below the ragged section (or where the quill is thick enough to support the horsehair tassels).


Next, trim the webbing of these feathers to resemble the eagle tail feather shapes shown in (Fig. 9-13), always cutting from the tip toward the base of the feather.


If you do not have the skill to cut these different shapes, then practice on waste feathers until you have one with a satisfactory tip. The desired shape is more like the rounded end of a table knife than the extreme point of the natural turkey feather. Then make a template by placing the feather flat on a piece of thin cardboard, and trace the outline with a marker. Cut out that template and use it as a guide to cut all the bonnet feathers. (Fig. 9-14) The template may not fit all feathers exactly, but it will be helpful in achieving the desired shape.


If you are going to have a center feather, pick a turkey feather that has approximately the same amount of webbing on each side of the quill. Then trim it so that the feather is symmetrical.
COMPLETING FEATHER PREPARATION


Extending The feathers:
Real eagle feathers typically were both wider and longer than turkey wing feathers. So, for a nice, uniform look to the bonnet, it is a “must” to extend the feathers to about 14” total length. This requires measuring 12” down from the tip to the quill end, cutting off the excess quill, then gluing a wooden down into the quill end and trimming the dowel so that the total length is 14” (Fig. 9-16)


After the feather is measured and trimmed, proceed as follows:
- Start with a full –length dowel (usually 36”) and shape a taper on one end with sandpaper and/or a sharp knife. (Fig. 9-17)

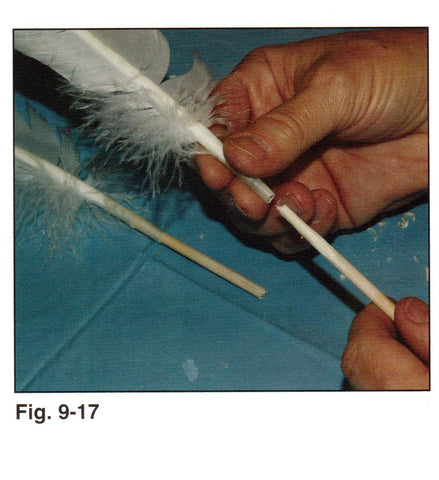
- Slip the dowel into the quill as far as it will go without splitting the quill. (if it does split a little, don’t worry. The glue will hold it all together) If it does not go in at least ¾”, remove the dowel and taper it more.
- When the tapered end fits satisfactorily, measure from the feather tip down 14” onto the dowel and marks it. Remove the dowel and cut it off.
- Place glue evenly on the tapered dowel end (use a small artist’s brush to spread the glue), then insert the dowel and set the feather aside to dry 2-3 hours. (Fig. 9-18)


- Repeat on all the other feathers.


Option to Equal Lengths:
Note: An alternate method to making all the feathers the same length is to graduate them – again, with the use of extensions. Eagle feathers were not all the same size in the bird’s tail, with the shortest feathers being on the outside of the tail (sometimes referred to as “blades” because of their resemblance to a table knife). The shorter feathers were reserved for the back of the bonnet (or a trailer).
Before adding dowel extensions, lay the feathers out, Lefts and Rights, and within each group, placed from the longest to the shortest. The longest feathers (which will be in the front part of the bonnet should be 14” after being extended, and the shortest feathers in back should be at least 12”. So, if you are using 30 feathers, each feather as you go from front to back will be 1/16” shorter than the feather next to it. (2” = 32/16”; 32/16 divided by 30= approximately 1/16”) Another way to figure would be to take the total number of feathers on one side (for example, 15) and if they are to graduate a total of 2” (from 14” to 12”), then size them in small groups of 3:3 feathers = 14”, 3 = 13 ½”, 3= 13”, 3 = 12 ½” and 3 = 12”. You probably will not notice the difference in lengths when the feathers are actually on the bonnet as they graduate from front to back.
Note on Trailer Bonnets – Although the Trailer feathers may be extended to the full 14” length, 12” feathers will usually be satisfactory.
Secondary Lace Holes:
You will find it advantageous to now mark and piece each feather through the back of the quill for the Secondary Lace which will be used later. While the primary Lace attaches the feather loops to the crown, the Secondary Lace (sometimes referred to as the bridle) actually keeps all the feathers together in uniform position so as to from the “bonnet” effect.
- Turn the feather over with its back up.
- From the end of the wood dowel, measure up 4” on the back of the quill and mark it with a pencil.
- Take an awl and pierce the quill going from side to side through the back (Fig. 9-19) The resulting hole (really a “split”) should open big enough to later pass the Secondary Lace. If using a buckskin lace, you will benefit from widening the split vertically with a pen knife or Xacto® Knife.
- Mark and pierce all of the bonnet feathers at the 4” distance.


Loops:
After the glued dowels are dried and the lace holes are made, it is time to attach the leather loops. Stiff Leather – even thin rawhide – is much preferred to soft leather. Stiff leather helps the feathers in the front of the bonnet stand up, as you will discover when you lace feathers to the crown.
- Cut leather strips ¼’’ x 4 ¼’’, one for each feather, plus one more for the Major Plume. (Fig. 9-20)


- Fold a strip in the middle, apply glue to the inside and then position the leather on the end of the dowel. Leave a small space between the dowel end and leather creating a hole just large enough for your lace to pass through (no larger than a pencil). (Fig. 9-21)
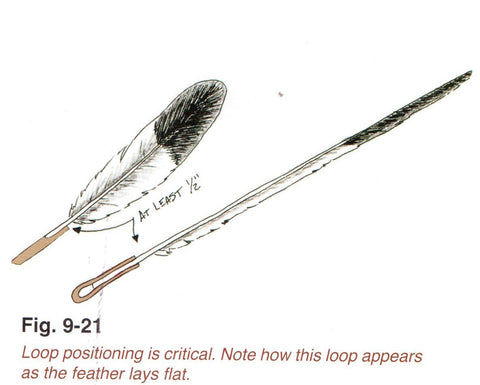


- Use a 12’’ – 18’’piece of heavy thread, such as but – ton & Carpet thread, to tightly wrap the leather onto the rawhide. Make sure that the hole in the loop stays parallel with the feather webbing. EXTRA CARE should be taken with this last step: If the loop is not positioned correctly, the feathers will not lay flat against the crown.
- Prepare all the feathers with leather loops.
Rawhide Note: If you use actual rawhide, it should be thin enough to be flexible. Dampen the raw-hide in order to make it flexible enough to conform to the shape of the quill as it is tied into place. Glue also should be applied to rawhide strips, as described above for tanned leather loops.
Plume (Fluffie or Fluff) Preparation:
Next, Base Plumes (Fluffies) will be applied to the feather. Fluffies can be placed on the front only of the feather, but it looks better to have both front and back fluffs.
- Select 3-5 plumes 5” – 6” long for each feather (de-pending on whether you want 2 or 3 for the front and 1-2 on the back). A very full effect can be achieved with 3 front plumes and 2 on the back.
- Most plumes have a second “mini fluff” on the back, growing from the bottom of the quill. Prepare each plume by pulling off the mini fluff, as well as 1” – 2” of the webbing from the base of the large plume itself. (Fig. 9-22)


- (5”-6” plumes will cover a lot of the “eagle” feather and may be more than you want. If you do not want long base plumes, first cut off the lower quill to make the plume 3 ½”, then strip off the lower 1” of the quill ).
- Apply the appropriate number of Fluffs to the front and back. Base plumes can be glued on, tied, taped or any combination of the three. However, taping is not recommended, as the adhesive will fail over time. If gluing, we recommend doing the fronts of all the feathers, letting them dry and then doing the backs. Position the end of the quill just above the end of the dowel, 1/8” – ¼”. To tie, make a couple of thread wraps around the lower part of the loop (just above the loop hole), then continue to thread wrap upward as you add fluffies one at a time. Finish with the thread by tying a couple of clove hitches. (Fig. 9-23)
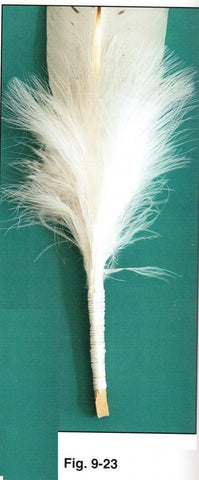


Note: Whichever method you use, the distance from the end of the dowel to the top of the wraps MUST be a little less than 2 ½”, or else the “fire-cracker” material will not cover it.
Base Wraps:
(Regardless of the methods chosen, we suggest you read all instructions below before beginning.)
- Cut pieces of red wool or felt into 2 ½” x 1 ½” pieces, enough for all the feathers (Including the Major Plume).
- Wrap a piece of the material around the base of each feather so that it overlaps itself in the back and does not cover the hole in the leather loop. Remember that the 2 ½” dimension goes up and down and the 1 ½” dimension is the wrap-around dimension.
- Not all historic or contemporary warbonnets have thread wraps. (Fig. 9-24) However, this feature adds additional visual interest to the finished product.


For thread wraps, first wrap the material as in Step 2, then hold the cloth in position with one hand, and now wrap and tie bands of thread near the top and bottom. (Fig. 9-25) You should leave an inch or two of the thread sticking out, to be used as a tie when you are through (Fig. 9-26) These band should be about ¼” wide. (Fig. 9-27) Tie off the ends of the thread, and then clip off the excess. (Fig. 9-28) A drop of glue on the resulting knows will secure the knot for years to come.


These photos show feathers completed with variations in the use of components such as tip plumes and thread wraps. (Fig. 9-29 and Fig. 9-30)
Option: Before wrapping the thread bands, you may wish to sew up the back of the red material with red thread. Some “old timers” preferred this technique, and, of course, it is necessary if you decline to use thread wraps. Following is an efficient way to apply “firecrackers” without threads bands: (Fig. 9-31)

- Apply a thin bead of glue to one side of a piece of the red material.
- Wrap the material around the lower end of the feather so that it meets in the back center of the feather.
- Pinch the excess material together as in the diagram.
- After 5-10 minutes, cut off the excess material. The result should be that the edges of the cloth meet and lay flush.
- Use a whipstitch to sew up the cloth seam.
- As you can see, this Option – with the exception of sewing up the back seam – can also be used to prepare feathers for the wrapping of thread bands.
- Finish all the feathers with red base material and thread bands, if desired.
TIP Decorations:
Tip decorations should be applied after the above steps are completed. You can apply plumes only, hair tassels only, or both. With any of these, it is nice to have a “spot” at the bottom. (See Figs. 9-29 & 9-30)
Tip Plumes:
Tip plumes will add a nice extra touch of color to your bonnet. If you want both tip plumes and horsehair adornments on the feathers, the hair must be applied before the plumes.
Horse Hair:
- Lay the feather on a protected work surface with the glossy (front) side up. Cover the bottom half with a book so as to weigh it down and keep it steady. (You may do several feathers at once by placing their ends under one book.)
- Hold a bunch of horsehair (the amount you want on one feather) between your thumb and forefinger of the left hand near one end of the bunch. Tamp the hair ends to get them even, as much as possible. Then trim the end of that bunch even with sharp scissors.
- While still holding the hair bunch, place a ½” long strip of glue at the top of the feather. Then carefully lay the clipped end of the hair bunch on the glue and gently press the hair down so that all the hairs make contact with glue. (Fig. 9-32 & 9-33)
- While still holding the hair in position, place any kind of weight (e.g, another book) on the hair bunch above the glue so as to hold the hair firmly.
- Apply horsehair to all the feathers and allow the glue to completely dry.


Tip plumes And/or other decorations:
As described in the Historical Section of this booklet, there are a variety of options for tip decorations. These include tip plumes, patches of rabbit or ermine fur, a circular piece of white tape or buckskin, a dab of white clay, etc. If you chose to use any of these methods, apply the decorations now over the glued end of the horsehair.
Tip Plumes:
Tip plumes are usually short, no more than 2”, and they generally have a backward curve, plus a “mini fluff” on the back. If you already have short fluffs, first pull off the “mini fluff”. With larger fluffs, simply clip off the extra length of fluff and quill at the bottom to make a 2” tip plume; this also will remove the mini-fluff. (Fig. 9-34)
If the fluffs have any backward curve, use your fingernail to gently crimp the plume so that it is straight and flat. Now, apply a tiny drop of glue on the clipped end of the glued horsehair and press the bottom of the tip plume into the glue so that it covers the end of the horsehair. (Fig. 9-35) Allow to dry. (If you have not already noticed, white craft glue dries clear, so it will not apparent.) (Fig. 9-36)


“Spots”
If accent pieces of fur (cut into dots, squares, rectangles, etc.) are to be used – either on the feather tips or on the body of the feather, as in Figure 7-27a – mark the desired shape on the leather, side of the fur. (Craft tip: Make a pattern of thin cardboard and trace around it.) If the shape is a square or rectangle, orient the long axis of this design so that it is parallel to the direction of the hair. Then carefully cut the piece out of the hide with a craft knife or razor blade, but do not cut hair on the other side as you cut through the leather. This will give the finished “spot” a nice, natural look by not having the hair chopped off the around the edges.
Cut out all the pieces. If using horsehair but no plume, glue one spot to each feather so that it covers the clipped end of the horsehair and allow it to dry.
If the feathers have both horsehair and plumes (or plumes only), glue on a spot so that just the bottom end of the plume is covered.
Gypsum: An Alternative “Spot”:
As discussed earlier, an authentic, historic method of tip decoration is to apply various types of white paste over the end of the horsehair tassel. (See Fig. 7-24) Contemporary bonnet maker Bill Brewer uses the following method: Buy powdered gypsum at the hardware store. As soon as you glue the horsehair to the feather tip, liberally sprinkle on the gypsum and very gently press it into the glue. When the glue is dry, simply blow the excess dust off of the feather.
“Double Tips” Decorations:
If you really want to fancy up your warbonnet, you also can decorate the insides of the feather tips. On the back of each feather, simply glue on another tip plume ad place a spot identically to the way the front of the feather is decorated. It is not necessary to add horsehair, as the hair tassel is readily visible from both the front and back sides of the bonnet.
Pompon:
This is an optional item which can be used in place of a front center feather. Components are not included in the Materials list at the beginning of this chapter. (See Fig. 7-33)
To begin construction, a stripped wing spike quill (or stick/dowel) the same length as the front center eagle feathers is readied. To use a quill, start with an extra-long spike, then cut off the thin, weak tipoff the quill down to a thickness that will support the weight and movement of the hackles. (Note: In most of the examples the quill/sick is straight, especially in the Blackfoot Straight Up bonnets. However, in some of the Sioux examples, the quill has a slight backward curve like the other front feathers in the bonnet.) Rooster hackles in two different colors, red and black, have been seen on museum specimens, with red being the most frequently used. Today, craftsmen can buy hackles that are sewn together and sold as “strung saddle hackles”. A string of these would be easiest to use, although hackles can be tied on individually if that is all that is available to the craftsman. We recommend 5” – 6” hackles.
Before tying hackles to the quill, pierce the quill for the secondary lace. Further prepare the quill by attaching a rawhide loop or making a self-loop in the quill end. (Some Straight Up Bonnet examples have no loop; rather, the end of the quill is left bare, and the completed pompon is firmly stitched at its bottom end to the center of bonnet’s head band.)
Begin by tying the tart of the hackle string approximately 2” from the top of the quill, then tightly wind the hackle string downward and around the quill until you reach 1” or less from the end of the quill. As you go, orientate the hackles so that they flare outward like the photographic examples. Cut off the excess of the hackle strand, then tightly bind the base of those end hackles to the large quill. Now apply a wool fabric wrap (firecracker) that covers both the end of the hackles and top of the feather loop.
Major Plume:
There is an endless number of ways the wing spike can be altered and decorated. (An alternative is to use a slender wood dowel.) (Fig. 9-37) For spikes, the basic feather is clipped off at the top, down to a thicker portion of the quill which is able to bear the weight of the tip adornments. Then, sections of webbing are sometimes trimmed or clipped so that the webbing itself in those areas becomes decorative. (Fig. 9-38)


In addition, webbing can be removed completely from sections so that the bare quill at those points can be wrapped with strung beads, fur pieces, etc. (Fig. 9-39) Usually, large “breath plumes” are tied to the tip end, as well as strips of thin ribbon on yarn 
Note: If you use a wood dowel, it can be decorated similarly, but it should be covered completely with yarn, bead wraps, etc. so that none of the wood remains exposed.
Modern “major plumes” are constructed from a turkey wing spike that first has been straightened, and then a leather loop with red wool covering is attached like the other bonnet feathers. (Note that the loop is positioned on the sides of the quill instead of front and back.) An older alternative method of attachment is to make a self loop on the thick end of the quill. (See Fig. 7-9) Once it is attached to the crown, the major plume is free to swing and move, thereby adding grace to the already attractive sway of the bonnet itself.